Coiled pots are constructed by gradually stacking and joining coils of clay one on top of the other. The coils can be left visible or can be smoothed away depending on your desired aesthetic end result. It is important that the coils join well during construction to avoid cracking or separation during the drying and firing process.
To avoid cracking or coil separation, the clay is required to be soft and using the proper process to connect the coils together. You can use your thumb or index finger to smooth the coil into the lower level coil or use a wooden or silicon rib tool while the clay is still soft. If you want the coils to show on both, the inside and outside of the pot, slip and scoring is required but with no guarantee of surviving the drying and firing process without coil separation.
See a basic step by step example below where the coils are not visible in part of the pot and visible with surface texture on one side of the pot's rim.
How to Make a Coil Pot
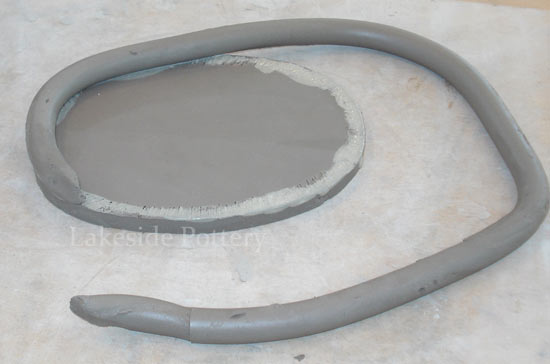
1. Flatten piece of clay to about 1/4" thickness. Use rolling pin or a slab roller. Cut slab to desired dimensions. Ahead of time prepare clay coils by hand or with an extruder. Make sure your pre made clay coils are covered with plastic to keep them soft - coils dry out very quickly.


2. Score and slip slab and lay the first layer of coil. Push the coil firmly into the slab. Cut first layer of coil as illustrated below to insure perfect fit around the parameters of the slab. Remove the unused coil pieces and blend the joint. Pinch / scrape the coil with one finger into the slab smooth using your finger, a rib or a wooden tool.

3. Smooth the outside using a rib. Place the next layer of coil, pinch and smooth and in previous layer. When merging two layers, make sure that one hand is supporting the clay on one side while the other hand pushing / smudging the other side.


5. To widen the pot, use longer coils. If taking a break cover your work and pre made coils so that the clay will remain moist and soft.
6. Use a paddle to both shape the pot and strengthen the coiled wall. Dry slowly by covering the pot loosely with plastic before Bisquing.

http://www.lakesidepottery.com/Pages/Pottery-tips/Making-a-clay-coiled-pot-Lakeside-Pottery-Tutorial.htm
.jpeg)
Here is some pictures of me making my ceramic bowl using coils.
.jpeg)
.jpeg)
.jpeg)
Before adding any slip or glaze I wanted to stamp my elephant into the bowl using the stamp I create earlier. I could then add the slip on top and rub away so that the elephant stood out and was a terracota colour.
.jpeg)
.jpeg)
Next I added a yellow slip on both, rubbed away my elephant and then fired them. The colour comes out a lot lighter before the gloss is added. This worried me a bit as I thought I would have a very light yellow. I then added a transparent gloss on top for a shiny effect. Below are images of my pots after being glazed.
.jpeg)


After this we screen printed my final design on to the ceramic transfer paper with the ink that allows the design to stay and the rest burn away. The pot was then re-fired.
Below are all the practice pots and tiles we produced during this brief that helped me decide which processes to use.
.jpeg)
Hello Amy,
ReplyDeleteYour post above used our coil pot tutorial (text and photos with our water mark) is great although it is the proper and morally correct practice to mention the artist you have borrowed his/her work to advance your cause.
A credit to Lakeside Pottery and it's studio with a direct link to the following link is greatly appreciated:
www.lakesidepottery.com
Kindly, Morty and Patty
Lakeside Pottery Ceramic Studio
543 Newfield Avenue
Stamford, CT 06905
203-323-2222
www.lakesidepottery.com